Sunday, August 30, 2015

Tim Holtz August tag: Circus

Here is my tag for August,
just in the nick of time!

It took me a while to come up with an idea, for I do
not have those letters. Then the circus came to town and
my idea was born! Love those Tim Holtz circus stamps,
so quiqly got them out.

If you want to see all the details
and the techniques of Tim, please take a

Here is my finished tag.

Now as for some details:

 For the background I used the
chevron die instead of the letters.
After cutting and adding the tissue paper
to the 2nd tag, it was easy to glue the 
cut tag on top. And I do love the effect
it gives.

These arethe colors I used on the tag:
sort of vintage circus colors.

On top of the tag a small filmstrip, for
don't we make lots of pictuires when we go
to the circus,or little video's?!

And her the stamped image that i colored with the
same colors as used for the background.
I typed the words with the computer. 
Splyshing the tag with gold left some spots
on the words, I might do them again.....

Thanks for looking!


Have a creative day!


Sunday Scrap: Twin-book

Last Wednesday we had a 
blog hop and i told you I had some computer
problems and was unable to post all the 
pictures I wanted. Today I make it up to you
and share my project.

and I knew right away that I needed to have it.
It is in the store HERE.
And then the twinchie album became a Twin-album!
For with the new babies there are so many cute pictures,
I cannot print enough of them and this album is the cutest!

So here is the front of the album. All papers
come from the Woven Strands kit. The owls are the theme
of the baby anouncement card,so I had to add those
(from the It's a Hoot kit) and the letters of
the twins are the Michael Strong alphabet stamps.

The flowers are made with some of the UM stamps.
Embossed with glitter black embossing bowder and cut out. 
the heart is apunch and a gemstone from the kit.
Leaves are dies as well as the sculped background.
And now for the inisde of the book:
you can click on all the pictures and see a larger version.

This is on the inside cover of the book
and I want to share with you how it is done.

First I stamped the UM tree stamp ( from the borders and
backgrounds here) in versamark and embossed it
with black embossing powder.
Next I took a green inkpad and a fingersponge.

These sponges make nice round stamps.

I used it to cover the top of the tree.

With brown I colored the roots the same way.

And the trunk and branches I colored with a 
dark green glaze pen.

Now you will see all the inside pages.
Some words are stamped...and this kit has just the
perfect sentiments fo my twin book
and some words I printed with the computer.
The free font for this kit is called:
Elementry Gothic Bookhand and you
find it HERE.

Even the twinchie parts (2 inch x 2 inch) come in
as handy elements.

But by cutting a 4 x 4 inch picture, you
can also add a picture in the little pockets.
Please have a look at all the pages I created,
they do not need much explanation.


The last page is the inside cover of the album
and a pocket was created here.I made a tag to 
put in the pocket,but because the tag became to long
I had to cut a piece of. i added this on the pocked
and it gives a wonderful effect.
Here you see all of the tag.

Thank you so much for looking
and sorry again about not posing
last Wednesday. I hope it was worth it to
come back here.

Have a creative day!


Saturday, August 29, 2015

Saturday card: challenges


Happy Saturday to you all!

Here I am with a card I made for 2 challenges:
Sketch challenge
over at the 

and a color challenge

came quickly to my mind and here is the result:
First I stamped the square on the papaya colored 
paper and embosed it with jade embossing powder.
Cut out the stamp and matted thison lavender colored paper.

On top of the square I embellished it with quite a few
lavender colored gemstones.
A bakers's twine and a birthday sentiment finished
the card.

Thank you for looking!
CAS(E) this Sketch
Have a creative day!


Wednesday, August 26, 2015

Club Scrap Blog Hop: Woven Strands


Welcome to another Club Scrap Blog hop.
Hope you came here from
and admired her wonderful artwork.

First a little confession:
I have some computer problems
and so I cannot print all the pictures
and things I want and getting this mail
through another computer as not
to dissappoint you today.

My other project I hope to share soon,
for it is just too cute.

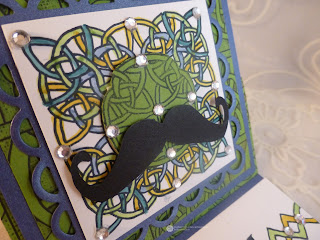
Today I have an easel card for you.
Instruction for a card like this can be found 

I made this card for Raymond (my DH), who
had his birthday yesterday.

This is the front panelof the card with
one of the wonderful Woven Strands stamps.

When you open the card,it looks like this
and stays standing up behind the sentiment.

Lots of bling came with this box
and as my DH is a gem, of course I added a lot!
After stamping the square stamp and coloring it,
I akso stamped it agai on apiece of green cardstock,that is
added with foamtape in the heart of the stamp.
The moustache symbolizes my husband
and is done with a die by sizzix.

This way the card looks sideways.

So for mor inspiration you hop on now to

If you loose your way,
you can always go back to
the main Club Scrap blog
where you fnd all the participants and
their links.

Happy Hopping!
Have a creative day!


Tuesday, August 25, 2015

Club Scrap Blog Hop Sneak Peek


Here the start of my project for 
Woven Strands Blog Hop
tomorrow.
I sure hope you stop by to see 
the result of my crafting.

Have a creative day!


Monday, August 24, 2015

Stencil Time 8

Sometimes you have a need for sympathy cards
and these days I need a few. I came up with this idea
with the stencil and green and brown ink.

The papers and sentiments are all by Club Scrap.
Sentiments are from March 2014 Trees.

Start with laying your fern stencil on top
of the paper.

Take the green ink and a blending tool
to sponge all around the fern stencil.
Now take the brown ink and just go
around the fern, not the whole panel.

Move the stencil to the other part of the panel
and take the green ink again and
rub again just around the fern.
You will see 2 tones of green when you move
the stencil away.
Stamp on a seperate piece of white paper
your chosen sentiment and mat it on the kraft
paper. Move it onto the place you want it
and use the stencil again. Lightly add some
brown in on the sentiment. 
On the finished cards I added some gemstones that came 
with the Woven Strands kit.

Thanks for looking and remember Blog Hop on Wednesday!
I have a sneakpeek for you tomorrow........

Have a creative day!