Sunday, July 31, 2016

Sunday scrap page: Flowers


Nothing special happened this week,
so I took my camera and went into the
garden to make some pictures for my
scrapbook page.
 The flowers are all out and look beautiful.
Also I wanted to capture the butterflies, but they went away
everytime I came close with the camera, so I was glad
I could add some Michael Strong butterflies to my pictures.
I stamped tem with versamark and used some holographic embossing
powder. it is a pity you don't see that on the picture.

The sentiment is a digital quote by Create with TLC
and printed with the computer.

Fot the banner at the bottom, I used the flower from the 
Hannah's busy bee stamp set. The flowers are colored with 
a brush and some ing direct from the craft sheet.

The papers for this page are from the Club Scrap Trees kit.
You might also notice that i used Mike's leave stamp
for the background of this page.

Thank you for looking
and have a creative Sunday!


Saturday, July 30, 2016

Saturday sketch card: best fishes!

My sketch card today is for the 

How about changing the bird into fishes?!
I used Michael Strong's mini fish
stamp and the steam from the coffee set.

First I stamped the steam in blue after
sticking a piece of post it note on the side 
of the card, so the steam would not go all the way 
to the side of the card. I stamped the steam 2x.

The sentiment is a stamp from my stash from
unknown firm.

The fishes are stamped on orange paper and
embossed with gold, then cut out and added to
the card with foam tape.
The sequin bubbles are glued to the card with glossy
accent.

Here you see the sketch that i followed.

Thank you for looking
and have a creative day!


Friday, July 29, 2016

Club Scrap July 2016 Artist Team Challenge


Artist Trading Cards and Pocket Letters are very popular right now. ATCs are 2.5 x 3.5 inch pieces of artwork...the size of a playing card or sports trading card. The idea of creating nine ATCs to fit into a Pocket Trading Card Protector and mailing it to a friend became the “Pocket Letter”. If you have no idea what this is and want to read more about this, go HERE.

I guess you have seen what fantastic cards
Pam has created for you on her blog
and came over here for more ideas.

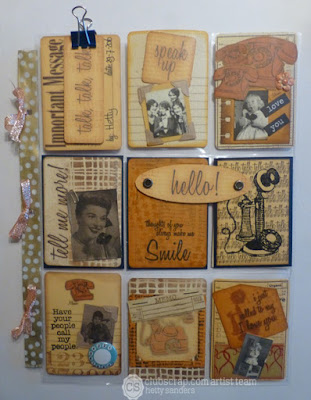
This is my pocket letter:

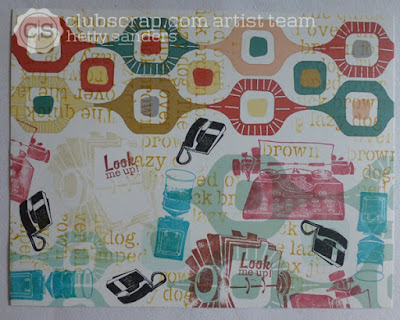
I found these cards in my stash:
They are from the kit Gimme a Ring  Jan 2009.
It is a kit I love very much. The retro style and the 
colors too. So this became my theme for the pocket letter.
I googled some vintage phone pictures and together
with the little materials I had left from this kit I got to work.
So here are the ATC's for the pocket letter (left to right):

#1 I love also to have something on the outside, so with the 
book clip I added one of the cut aparts from the kit. 
  I used this card to sign the letter and added the date of making it.

#2 The photo corners are from one of the CS kits, another cut appart
and a vintage picture from internet.

#3 The telephones where on a piece of scrap I had in the box, so 
I cut them and used them for decoration on the card. Another
picture from internet. The words are Tim Hotz stickers. 
#4 Here i tried to combine the tree ATC's the background of this card
is decorated with the Cape Cod stencil and a vintage picture
from internet with a tiny paperclip from one of my findings boxes.

#5 background with the Cape Cod stencil and the sentiment from 
the rubber stamps from this Gimme a Ring kit. The "hello"
that is fastned on the outside of the pockets is another cut apart.

#6 Here I stamped and embossed the old fashioned telephone
with black embossing powder. Then stamped it on a post-it note
and cut it out to cover the embossed image. Now i took the "taktalktalk"
stamp and covered the complete ATC.

#7 A stamp from this month's Office Space kit worked perfect 
for the theme of the pocket letter.And  found this cute dial button
in my stash.

#8 More Cape Cod stencil use for the backgroun d and some 
cut aparts. The memorandum stamp from Office Space stapled
to the ATC. 

#9 I loved this cute little girl on the telephone and there was 
a perfect matching text. The hearts in the background are
from the Fizz kit.

The pocket sleeve is decorated with washi tape 
and ribbonson the left side.

On the information blog i learned, that when sending this pocket
letter, there are some more rules: adding some gifts and a real letter
with a little about yourself for the receiver.

So I added a bag of sequins, a ribbon and some
sticky pearl in the first 3 pockets.

So here on the left you find the "ketter"in the pocket letter,
a few lables and a bag of photo corners. 
A little more about the letter.
i created a real pocket  to add the letter.
I decorated the pocket with the Cape Cod stencil.

Hrtr is the template of the pocket
if you want to create one too.

And in these last pockets you find some washi tape (best to
tape it around a credit card) and a clear stamp. In the middle 
pocket you find an explatantion of the pocket letter (this is
a freebie here) and a bag of Dutch Blend tea to drink while crafting.

Now to send this pocket letter, you just fold it harmonica wize and 
find a matching envelope, or make your own envelop for sending
 it to your Pocket Letter Pen Pal!

I used my last piece of 12x12 inch paper from the Gimme a Ring
kit to make a large enough envelop for the Pocket Letter.
I closed it with washi tape and  it is ready for sending!

Now go on to 
Jennifer's Blog for more inspiration.

If you hapen to loose your way, there is always the
Club Scrap main blog. More inspiration
and the list of all the participants of the blog hop.

Thanks for looking 
and have a creative day!

Thursday, July 28, 2016

Art Neko screen devider card

Here I am with another creation for the 
Art Neko design team.
Today I created one of these cute 
screen devider cards. I have seen these around, but
never actually created one myself.
Have you?

Well, here are the measurements if you want to make
one too. You need a piece of cardstock of 11 x 5,5 inch
and a scrore tool. You score at 
2 3/4 - 5 1/5 - 8 1/4
and fold the card harmonica wise.

For the bottom of the sceen I used this decorative 
label punch by Stampin'up!. I notice some people
also use a decorative punch at the top,
but I like it to keep straight this time.

For the pannets you cut this:
4x 2 1/8 x 3 3/4 inch black
4x 2 3/8 x 4 inch ivory (matt and stamping)

I created these black pannels, like a screen.
Once you have made one, you can use this as a template
for the other 3 pannels.

Before you add the black pannels on top of
the ivory paper, I stamped it first.
I covered all for sides with post-it notes
so the outside stayed unstamped (you could also
use strips of washi tape).

I used the following stamps:

The Birds on a Blossom Branch stamp:
and the blossom flower

When the stamping is finished you add the 
black screen pannels.

The cats are stamped on ivory paper again
and colored with a water brush getting ink of my craft
 sheet. I used the same color as I stamped them with.


With 3d tape I added the cats to the screen.
I am not sure if I want a sentiment up front, 
so I leave that for when I send it.

Thank you for looking
and have a creative day!


Wednesday, July 27, 2016

Club Scrap Blog Hop: Office Space


Welcome to my part in the 

I hope you arrived here from
Jennifer's Blog.

What to make I thought?!
Then one of my collegues at work asked me
if I had a card for the birthday of another  collegue.
I remembered I once made a birthday book, where
you add cards, so you always have some ready.
Idea was born and I looked for the instructions.
I found them on Splitcoaststampers HERE.
For this birthday book you need 6 12x12 inch cardstock
and 2 pieces of 6 x 73/4 inch pieces of cardstock.
On Splitcoaststampers you find perfect folding instructions.

Here is my book:
Andyou see it also already has cards in it.
I am ready for my colllegues!
 Not on all, but on some pages I added
some stamping for decoration. Not on all, for I
found that too busy.
I used my zutter for the binding of the book.
Below you see all the pages I made.
If you click on the photo, you will see a larger version.


Here are all the pages:

Now I wanted to share with you
how I made 8 cards in a jiffy.

I took one of the 8,5 x 11 inch pieces of paper
and stamped some of the Office Space stamps at random.
Yes, I used one of the printed papers and I used 
matchin inkpads for stamping.

I drew up this template for cutting the stamped cardstock.

Here you see it cut op.

I took some white papers and cut 8 cards, folded
them and spread out all the parts
of the stamped cardstock.

Here you see the finished cards. I added another color
 of cardstock to the cards and stamped some sentiments here and there.
Little flower embellishments from my stash.


Well, this was it from me.
I guess you need some more inspiration.
It is on 

If for some reason you loose your way,
you can alsways go back to the Club Scrap Blog.

Thank you for looking
and have a creative day.