Wednesday, May 31, 2017

Club Scrap Blog Hop: Adirondacs

Welcome to the monthly Club Scrap Blog Hop.
We present to you the May Adirondacs kit.
You can see all the participants on the main
but if you are hopping, you came over her from
Pam's Blog
and seen her lovely ideas with this kit.

I came up with this fun
Accordion pop- up 
album
that I have seen around and is just
perfect for this paper and pictures I have ready.

First I tel you what you need:
1 piece of cardstock: 9 x 12 inch (here blue)
2 pieces of bookboard 9,25 x 3,25 inch
2 pieces of paper 4,25 x 10,25 inch (here the arrow paper)
2 pieces of  9 x 3 inch (here red)
ribbon
bookbinding adhesive

Let's start with the bookcovers.
Use the bookbinding adhesive to glue
the bookboard to the paper. Fold the paper
around the bookboard and glue this too.

 Take the red ribbon from the kit and cut it in half.
Glue this half way of each of the book covers
and then cover this with the red paper with
bookbinding adhesive.
Now the covers are ready for decorating.
Here is the template for the inside of the book.
I scored everything first before cutting. So score
every 3 inches horizontal and vertically, then cut the 
middle part like you see above. 
Here you see how everyting looks folded.

This is from above and helps you the first time
you start folding.

Now you are ready to decorate the inside with pictures
and cut apparts from the kit.

When everything is done, you glue the
inside to the cover of the book and
you are ready to tie the ribbon around the
book to close it.

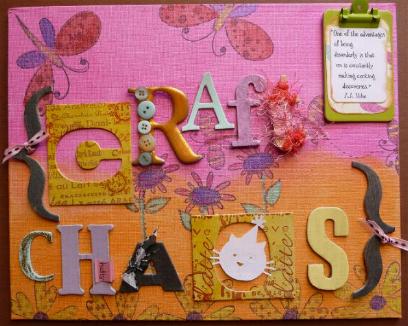
This is the cover of the book with
some of the cut aparts and little embellishements
I have left over from other Club Scrap kits
in the past. 
When you untie the booklet you see
the folding popping out.

And this is the inside of the booklet:
Owen doing some exploring in our garden.

At school the subject was insects and he colored this
butterfly beautifully. 

And around the garden he foun some ladybirds,
which he put in a small glass jar for showing in class.

Of course Aiden looked around too!

How about drawing a ladybird. Yes oma, I did 14 feet,
just for fun, I know they have six, I learned it at school.

Colin also looked at some grass growing while
Owen was putting the ladybirds in the jar.

Just one more look at the folds.

Now let's see what
Jennifer's Blog
gives you for fun inspiration.

Thank you for looking
and have a creative day!
Member of the Club Scrap Artist Team

Saturday, May 27, 2017

Saturday Sketch and Color challenge

For this card I used two challenges:
a sketch and a color challenge.

The sketch challenge is from the

and the color chahellange is from

The bold letters are the Alphabet stamps by
Michael Strong and the birthday die cut is
from thinlits by Tim Holtz.

The letters are stamped and embossed with
white embossing powder. Next they are cut with
an oval punch  3/4"x 1 1/2".

The flowers are also by Michael Strong and embossed
with white embossing powder. These flowers have 
matching metal dies to cut them with, but are also 
easy to cut by hand. On each flower is a sticky gemstone.

Thank you for looking
and have a creative day!


Friday, May 26, 2017

Limited Runs Stamps Progressive Challenge #4

Her my card for the #4 Challenge of
If you want to play too, you still can
and you find all the details HERE.
You can get this fun bug image for free
until May 29.

After printing the image, I colored it with pencil.
Then cut the image and added it to the card. on the wings 
I added some glitter glue to give the wings some shine.

The sentiment is by Create with TLC.
I made this aerosol can from green and black 
scraps of paper and in the background
I used a Tim Holtz stencil like I just had
sprayed. The fly swatter is an image I found online.

Yes, the bug season has started her
and we are prepared!

Thanks for looking
and have a creative day!


Wednesday, May 24, 2017

Club Scrap May Artist Team Challenge: Mash Up


Hello Crafters!
Here is the Club Scrap Artist Team for you with a challenge
to let the creativity flow. This month we were asked to create
a project, lay out or card with at least materials from 2 different
collections. This can be papers, stamps or embellishments. It all
starts at the Club Scrap Blog.

I hope you have arrived here from 
Jennifer's Blog and seen what her ideas where.

I put my thinking cap on and came up with these cute
little booklets for my grandson, who just loves to draw.
I went trough all my boxes and picked out some papers
that match nicely together. 
What do you need to make one booklet:
1x cardstock 5.5 x 8 inch
1x cardstock 5.5 x 3 inch
a piece of ribbon (aprox. 17 inch)
one button
some copy paper
needle and a piece of cotton or waxed linnen thread.

For my forst booklet I used a piece of Graffiti paper
and a button from the Sprinkles kit (PSL 2012).
I folded the cardstock in half and fastned the
button to the front of the booklet with a piece 
of raffia. Leaving the raffia on the button for
closing the book when finished.

Take the copy paper. I used 4 pieces and cut them to
5 1/4 x 7 3/4 inch. Fold it in half, punch some holes
in the center and sew these pages into the cardstock cover.
Now to cover the sewing and decorate the booklet,
take the piece of 5.5 x 3 inch and fold in half.
I used a piece of decorative Picknick paper. You can blue
it with tape of bookbinding glue.

Now glue the strip of cardstock to the booklet

and close the book with the raffia.
You can do a bow or tie it around.

Here are the 3 books I made before derorated.
You recognize the different papers?

For decoration I used the stamps from 
this months Adirondacks kit on the red banner.
On the middle booklet it is Creative Licence and National 
Parks stamps. On the last booklet you see the 
elephant and sentiment from the 2007 Serengeti kit.
You can see Owen loved the little booklets
and when he came from school I asked him which
one he liked best to start drwing in: of course
he picked the elephant. He loves wild animals.
Owen busy making his first drawing.

Here the inside with Owen's first drawing!
These mini booklets are super to take with you in your
purse with a small package of  pencils. This way you 
can draw everywhere.

And now over to
and see her inspiration.

Thank you for looking
and have a creative day!


Friday, May 19, 2017

Coffee and Mojo Monday 497

This card is made with the Mojo Monday sketch of this week.

You find the sketch and all the details

Background embossed with a coffee stain 
embossing folder and coffee bean embossing folder.
The sentiment behind the cup is part of
an Stampendous "wave words" stamp.

The cup is a stamp by Verve Stamps (Le Typewriter)
and  added a cute little spoon as a carm.

And of course I wanted to use my new washi tape.
This totally cute washi tape is from Doodlebugdesigns.

Thanks for looking
and have a creative day!